Preset for Luminar Neo. Download for FREE.
You can freely import those following Presets into your application.
- To view the location of Presets, navigate to the User Presets section in the My Collection area of the Presets panel.
- Click the item menu (three dots) next to a custom Preset and choose Show in Finder (macOS) or Show in Explorer (Windows).
- To copy Presets on your machine, just reveal the folder as described above. Then go up one level to the Users folder.
- Unzip the file downloades and simply drag the new Presets Folder into your Luminar Neo Presets User Folder.
- For best results, restart Luminar to load all the new Presets.
Quick Sunset
“Quick Sunset Preset” helps to pop-up light during sunset, is a quick preset from which start to edit your Raw files. Check how this is created after the images before/after.
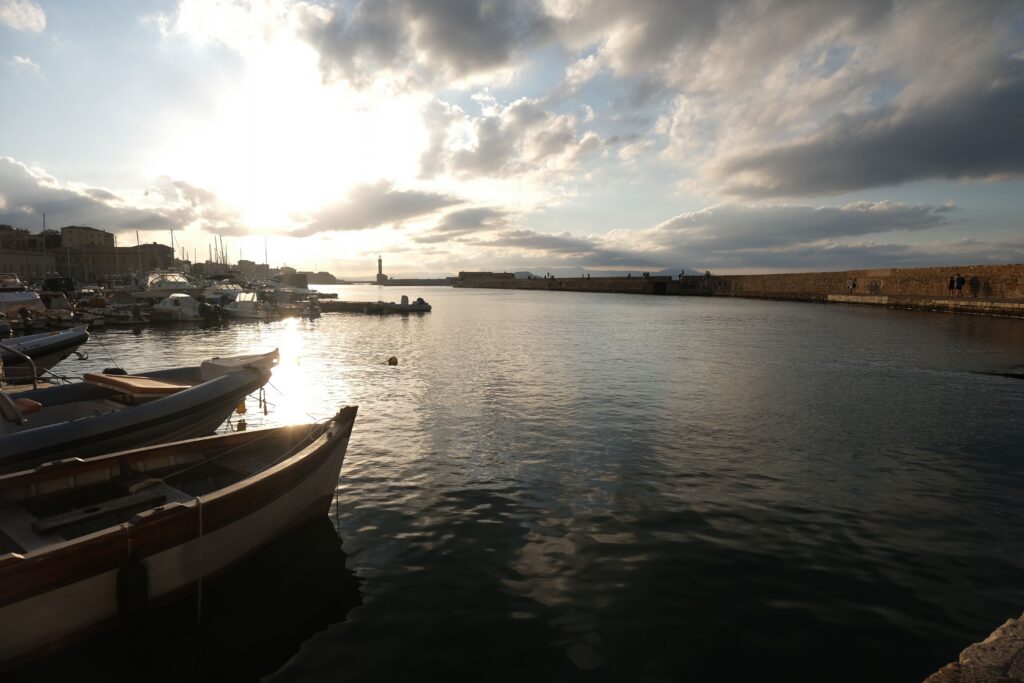
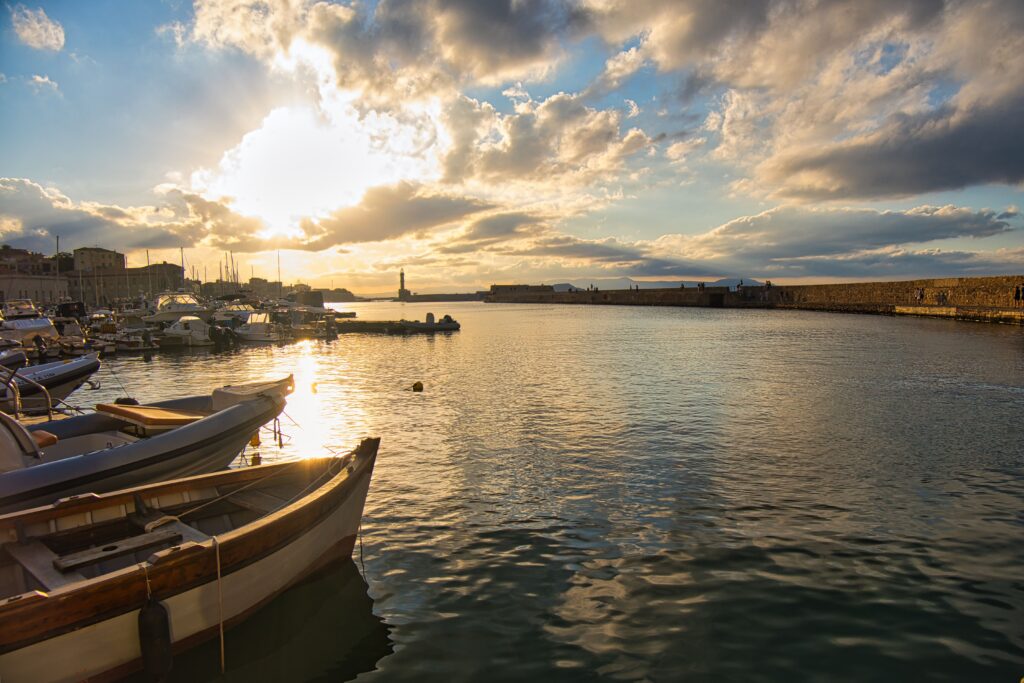
Here you can find the details of this Preset. Remember this is only a quick start preset, probably you need to adjust some level of correction or you need to add other to fit best editing for your photo.
Noiseless Raw – Low Adjustment
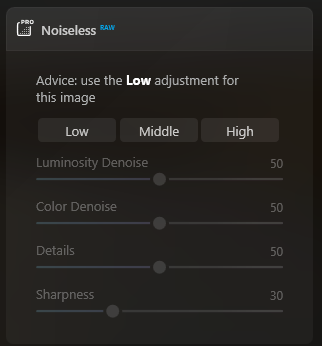
Lack of light together with high ISO make photos look grainy no matter you take photos with your phone or a DSLR camera. Image noise consists of randomly colored pixels that you cannot see on your little camera screen. Zoom the photo to 200% to find out if there is any noise.
Choose the correct level of adjustment for your image.
Develop Raw

The Develop/DevelopRAW tool contains the most essential controls for adjusting the color and tone of an image. Adjustments made with this tool will set the stage for all further adjustments.
Supercontast
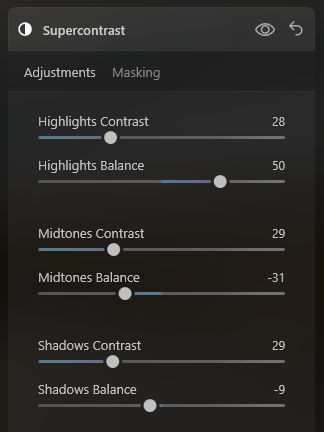
The Supercontrast tool precisely adjusts tonal contrast with six distinct controls spanning highlights, mid-tones, and shadows, allowing for finely tuned results.
- Highlights, Midtones, Shadows. These sliders refine the amount of contrast in the highlights, mid-tones, and shadows, respectively. Dragging them to the right increases contrast.
- Highlights Balance, Midtones Balance, Shadows Balance. These three Balance sliders define the midpoint for each respective zone. They allow you to define which areas of your image are treated as Highlights, Midtones, and Shadows.
Structure AI
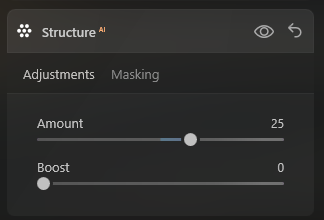
The StructureAI tool allows you to adjust the detail and clarity of an image. You can use this tool to reveal a great deal of detail or get a smoother image with less detail. StructureAI is the primary tool for increasing the contrast of an image and visualizing more details.
- Amount. This slider selects the strength of the StructureAI effect. Moving it to the right increases the amount of visible detail in the image. Moving it to the left removes detail and flattens the image. This tool is soft and produces natural results.
- Boost. This slider adjusts the overall display of details. Moving it to the right accentuates details. Compared to Amount, Boost emphasizes small details and is more aggressive. It offers an HDR-like look.
You can use a negative amount of StructureAI to create a blur effect. For precise control, consider using the Basic local masking adjustment to mask with brush strokes easily. For a heavier blur effect, use multiple instances for a heavier blur effect. Just pull the slider to the left for a negative effect that creates a blur.
Details
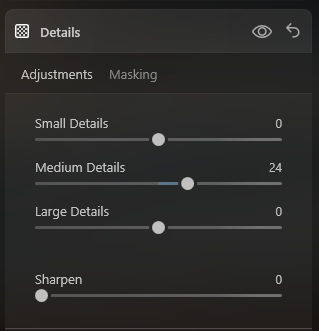
The Details tool helps you create dramatic photos and brings crystal-clear sharpness to your images. With the proper detail enhancement, you can make your photos look sharp, with no halos or artifacts.
- Small Details. This slider sets the sharpness of fine details.
- Medium Details. This slider sets the sharpness of medium-sized details.
- Large Details. Use this slider to set the sharpness of the global contours of objects in the image.
- Sharpen. The Sharpen tool helps focus soft edges in a photo to increase the clarity of focus. Use this tool to improve image quality significantly. Keep in mind that too much sharpening can give your photo a grainy look.
Landscape
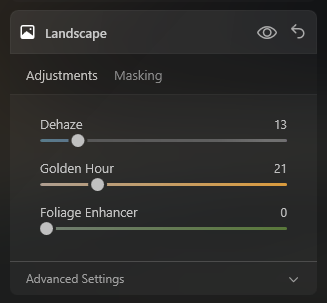
The sliders in the Landscape tool are explicitly designed to enhance landscape photographs. However, they can also help with real estate, travel, and nature photographs.
Standard Settings
- Dehaze. This slider applies the perfect blend of contrast, clarity, and color adjustments to eliminate the effects of fog and haze often found in cityscapes, landscapes, and aerial photos. It’s especially helpful when editing photos shot through glass or with a lot of mist or fog in the scene.
- Golden Hour. Use this slider to bring warmth, softness, and a golden glow to all of your photos. Simply dial in the amount of warm toning to introduce more overall color vibrancy. Quickly emulate the magic that happens just after sunrise and just before sunset.
- Foliage Enhancer. This slider automatically enhances the colors of foliage and greenery, making them more vivid and natural. It’s a good choice for nature and lush landscape images.
Enhance AI
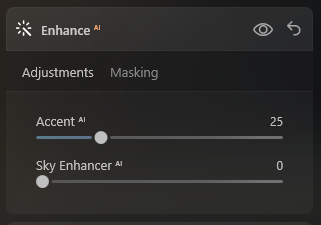
The EnhanceAI tool contains two helpful adjustments that harness the power of Artificial Intelligence to enhance your photos.